Learn how to sew my favorite heirloom handkerchief.
What You’ll Learn:
- How to sew edging lace
- How to use a wing needle
- How to use stabilizer
- How to miter a lace corner
Supplies You’ll Need:
- 1/3 yard of 100% lightweight cotton fabric (e.g. cotton batiste)
- 1 1/2 yards of 3/4”-wide cotton edging lace
- Lightweight tear-away stabilizer
- Coats Rayon Thread in coordinating colors
- Wing needle, size#100/16
- Edge/joining foot
- Husqvarna Viking Embroidery Designs Disc 11, design 21
- Husqvarna Viking Palace Script Font (optional)
- Husqvarna Heirloom Kit (optional)
- Small quilt ruler and cutting mat
- Water-soluble marking pen
Before You Sew:
- Cut one 12” square from the cotton fabric
Ready, Set, Sew:
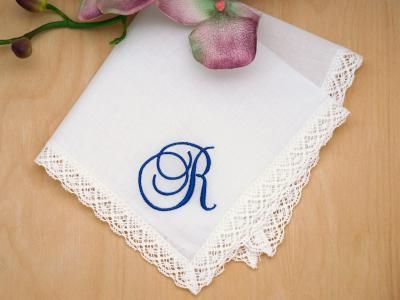
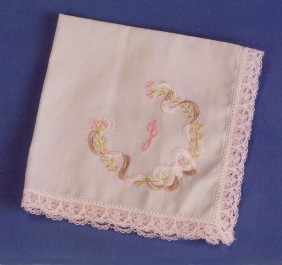
1. Add an elegant embroidery design or monogram a letter on your heirloom handkerchief. Fold one corner in half and make a crease that bisects the corner. A small motif less than 4” is ideal for the size of the hankie. Measure and mark 4” from the corner for the center of the embroidery design.

2. Cut a piece of lightweight stabilizer larger than your embroidery hoop. Place the stabilizer under the corner and hoop.
3. Following the instructions with your embroidery sewing machine, combine Husqvarna Viking Embroidery Designs Disc 11, design 21, with your monogram. Stitch out your design.
4. Remove the fabric from the hoop and tear-away the stabilizer.
5. Pin the edging lace to the embroidered square. Line up the scalloped outer edge with the cut edge of the fabric. Turn the corner by folding the lace back on itself so the fold is even with the cut edge of the fabric. Pin through the lace at a 45º angle then fold the lace up along the next edge. Continue to pin lace on the other sides using the same method at each corner.


6. To finish the final corner with a miter, fold and pin the lace at a 45º angle to match the other corners. Trim away the excess the lace.
7. Set up your sewing machine for a hemstitch (e.g. entredeux stitch or see below). Insert a wing needle and thread with rayon thread and the bobbin with a lightweight cotton thread.
HINT: Place a piece of lightweight tear-away stabilizer under a scrap of fabric and practice sewing this stitch along the straight edge of the lace. To use this stitch to sew on lace, it is important to learn how the stitch is formed. The needle swing to the right is the part of the stitch you will want to use to catch the edge of the lace. The rest of the stitch is sewn on the fabric to create a lacey effect. Try the Edge-Joining foot to help you guide the stitch along the edge of the lace. You will notice that the wing needle creates holes in the fabric as the stitch moves forward and backward in its special sequence.
Stitch Alternative: If your sewing machine is not equipped with the entredeux stitch, use another stitch that looks similar like a stretch blind hem stitch or even a zigzag stitch. Though it will not look exactly the same, it will work to attach the lace to the fabric!
8. Start sewing the hemstitch at one corner by guiding the stitch along the edge of the lace so the only part of the stitch catching the lace is the right swing of the needle. At each corner, stop with the needle in the fabric and pivot.

9. Trim away the fabric under the lace near the stitching. Be careful not to trim to close or the lace or stitch may be snipped!

Creative Option
If your sewing machine does not have embroidery capabilities, use rows of decorative stitches or hemstitches in a slightly contrasting rayon thread to embellish the hankie. Just add three rows of stitching inside the lace edging, spacing the rows 1/4” apart.